One of my friends on the Australian Cycling Forums read my ice on the birdbath story from yesterday and was worried that I might not be able to ride.
He thought a KtraK would be the solution.
Steinhoffs are no strangers to tracked vehicles
Dad owned a construction company that built roads and bridges, so my earliest memories are being perched next to him on a bulldozer, motor grader or dragline moving dirt around. Diesel fumes and freshly-turned dirt will instantly transport me back to those days.
I’m happy to say that the ice had thawed this morning and warmer temps are on their way, so I canceled my order.
If you’re in the land of drifting white stuff
If you don’t see a thaw in your future, you might wander over and check out KtraK’s web site. They have some interesting pictures and videos of their product hurtling down mountain slopes and throwing up sprays of snow.
Oh, by the way, the nifty front ski thingie is sold separately.
Today is going to be a potpourri of stuff that didn’t fit in anyplace else.
My Surly LHT had a sinking feeling
I mentioned that fitter John Palmquist told me that my bike was dialed in and that I shouldn’t be tweaking it. I was a good boy. I didn’t tweak.
On the other hand, I was riding with Jim Beloian the other day and observed that “the saddle feels just a little bit too low, which is odd, because I thought it was OK for the first 100 miles.”
“Just mark the position before you make any changes,” Jim suggested. “That way you can back to your starting point.”
“Beat you to it,” I countered. “I didn’t have a marker with me the other day, so I put a wrap of black electrical tape around the seat tube to mark it. See?”
That’s when I noticed that the tape was compressed about half an inch. The seat post must have slipped over time. Since I was going to follow John’s advice, I replaced the quick release seat binder with the factory model that came with the bike before making any adjustments
I raised the seat about half an inch and have been dinking with it in about 1/16″ increments until it feels just about perfect. Just goes to show that you really can tell if something is out of whack.
RealLITE is murdered
Reader in the Wild Mathilde and her friend from college, Beau Garrido, came over for a ride Monday. She’s going to do a triathlon next weekend and I wanted to see if one of my bikes would fit her. She’s currently riding an old beater bike with a rear wheel that wobbles like a drunken sailor, and the whole thing is not-so-slowly being devoured by rust.
While I was pushing my bike off the porch, the screen door slipped out of my hand and must have popped the RealLITE taillight in just the right (wrong?) place and snapped it right off.
Let’s see if the warranty is as good as it says. (In fairness, I murdered another one several years back and got a replacement back (since that’s all I needed) in a few days.
We stopped at the beach for the obligatory picture
It was a windy day, with gusts over 20 mph, but my Click-Stand did a great job of holding up the bike. I did notice once when I reached for the barend shifter that one of the brake bands had slipped down so far it was almost falling off. I think that’s one of the few problems I’ve had with the stand.
When I got home BOTH brake bands were gone
Tom Nostrant gives you three brake bands when you buy a Click-Stand, so I had one spare, but I figured out that left me one band for two brakes and no assurance that buying more wouldn’t be throwing good money after bad.
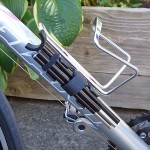
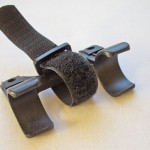
Velcro, the modern binder’s twine
Bungee cords were too long. Innertube pieces looked like too much trial and error. When all else fails, what is there to do but to reach for the roll of Velcro. [Note: most of the Amazon ties at that link were 8 inches long. That may be too short for most brake levers. I used a strip that was 11-1/2 inches long and 1/2″ wide.]
When I was a kid, the answer to everything was binder’s twine and bailing wire. Today it’s Velcro
Here’s what it looks like on the brake levers
I put the loop around the inside of the handlebar drops. It cinched down tight enough that there’s little danger that it’ll slip down like the supplied bands. It’s long enough that there’s plenty of overlap, so it’s unlikely to come loose. It’s also faster and easier to slide over the brake levers than the bungee-style bands, which were a bit of a struggle for me.
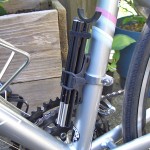
Winding it up made a bit of a wad
On the first pass, I wound the strap up on itself when it wasn’t in use. I didn’t like that. Because it sticks so tightly to itself, it was hard for me to find the end to unwrap it. It also made a pretty big wad inside the drops. I don’t find myself riding in that hand position often, but I was sure I’d find it annoying.
The solution was to tack the end of the strap to the body, leaving a big loop hanging out. It’s back out of the way and my handlebar bag pretty much hides it.
If you have a Click-Stand and don’t have a Velcro strap to try, drop me a comment and I’ll mail you one as long as my supply lasts.
After I posted yesterday’s review of Click-Stands, Tom Nostrant sent me a sneak peek of some new mounting brackets that will be available soon.
He said that they should be available possibly as early as the coming week for $10 or less. He still has to work out some pricing details. If I hadn’t already come up with a solution, I might have jumped on one of his new designs.
Will “flicking” lead to failure?
After I mentioned “flicking” the stand to assemble it, I received this comment, “One note about flicking out the alloy poles: with tent poles all manufacturers advise you to place them together and not to flick them out. Continuous flicking together leads to stresses on the pole sections that will cause pole failure. It happened to my tent just 3 weeks back when I was tensioning the poles. Not so critical for a straight bike support, but it is still under tension, so flicking it out will shorten its life.”
Here’s Tom’s response
I know that tent manufacturers don’t want you to flick open their tent poles. However, it is irresistible, so don’t fight it. I have used the same stand for 2 1/2 years and it shows no ill effects. I had a booth in the Seattle Bike Expo, and flick open a Click-Stand like a carnival barker over & over for two days. No problems. The only thing that can cause a problem is stretching the stand apart so the segments separate and letting them go. It can cause a burr in edge of the tube, but can be fixed with a small file.
I mentioned in the middle of the month that I can’t live without a kickstand or some other way to support my Surly Long Haul Trucker. After describing the benefits and limitations of my ESGE/Pletscher Double-legged kickstand, I said that a Click-Stand was on its way for review.
What IS a Click-Stand?
Think of a small sectional tent pole
The product is made of from four to six segments of Easton Aluminum tubing, from .340 to 4.33 inches around, depending on the model. The top has a rubberized “cradle” that holds the bike up and the bottom has a rubberized tip to keep it from slipping around. The segments are joined together with a bungee cord. A flick of the wrist causes it to click together.
Watch this video
It’s easier to see how the Click-Stand fits together than it is to describe it. I was showing it to my son, when four-year-old Grandson Malcolm wanted to play with it. You can see how easily it comes apart and how it fits back together. “Wow” IS the most common reaction.
How do you use it?
Is it complicated? After all, the beauty of the traditional kickstand is you kick it and it stands up.
The Click-Stand takes a little longer.
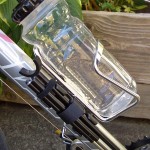
First, you have to slip one or both of the supplied brake band over the brakes to keep the bike from rolling. That has the side advantage of making the bike hard to steal. The casual jump and runner is going to be surprised when the bike doesn’t go anywhere and probably won’t think to check the brakes.
Secondly, you flick out the stand (WOW!), place the rubberized cradle under the top tube just in front of the seat tube, lean the bike over slightly and place the rubberized bottom end about 10 inches off the centerline of the bike. Your two wheels and the Click-Stick become a tripod.
How do you carry it?
It’s small enough to fit in a jersey pocket, but I don’t think that’d be comfortable. Bro Mark is going to see if his will fit under the saddle. Since I had a front rack with lots of space, I rigged something that works. I noticed that the five-segment Max-5 would just fit inside a piece of light-weight PVC sink drain that happened to be sitting on my work bench. The white color was a little ugly, so I wrapped it in black electrical tape to make it less obtrusive (and to give me a source of electrical tape if I needed it).
Velcro ties attached it to the rack and another tie made sure the Max-5 wouldn’t escape. It’s very rattle-free.
Will my bike topple over?
I was concerned about how stable the Click-Stand was and if it would have the same problems of being blown over or sink into soft soil or blacktop like conventional stands.
Mr. Click-Stand himself, Tom Nostrant, replied quickly:
Good questions. There is plan for not letting your bike blow over while being supported by a Click-Stand. The amount of lean of the bike is controlled by varying the placement of the foot of the Click-Stand. In windy or gusty conditions I lean the bike over more than typical. I have never had my bike blow over, nor has it been reported to me, but I can imagine it happening. How is that for a semi-answer?
Being able to vary the lean of your bike is helpful in other situations, particularly when parking on a slope, which is tough to do with a two-legged kickstand. The Click-Stand feet are not large, .360″, .380″, or .433″ depending on the model. They can sink in loose soil, though I think to a lesser degree than a kickstand. Because a Click-Stand contacts a bike above its center of gravity, it has a mechanical advantage when compared to a kickstand. Click-Stands & kickstands form different classes of levers. So the foot of a Click-Stand would exert less pressure on the ground than a kickstand supporting the same bike. Not an extremely satisfying answer, again; a Click-Stand will sink in loose soil, but a kickstand would have as well.
The kickstand sinking in would also be more likely to topple the bike. I have been looking for something that I could send along to put on the end of a Click-Stand if you knew it was likely to dig in, but I haven’t come up with it yet. One customer said that he carries the lid off of a two liter pop bottle for that purpose.
How well does it work?
I’m impressed. The brake band for my front brake is a little tight and takes some pulling to get over the lever. That slows me down a little bit, but I’m getting the hang of it. The stick itself deploys quickly. I wasn’t sure if I trusted it at first, but I’m getting over that. With both brakes locked, the bike isn’t going anywhere. The front wheel has a tendency to flop over when I’ve got the bar bag on it, but I’ve found the right angle to keep that from happening.
I stopped in the West Palm Beach’s Woodlawn Cemetery to look for a memorial to the victims of the 1928 Hurricane and spotted this child’s gravestone from 1927. Figuring that it would only take me a couple of minutes to take the picture, I depended on my double-legged kickstand to hold my bike up.
A gust of wind toppled the bike. Fortunately, no harm done, but I don’t think it would have happened with the Click-Stand.
It comes in four basic flavors
Click-Stand Classic – This is the original Click-Stand. It is made from .380″ diameter Easton aluminum tubing and can be ordered with either 4 or 5 segments. It folds to less than 10″ and weighs approximately 70 grams.
Click-Stand Mini-5 – The Mini-5 is made from .340″ Easton aluminum tubing and is divided into 5 segments. It folds to approximately 8 1/2″ and is small enough to fit into a jersey pocket or pannier.
Click-Stand Mini-6 – The Mini-6 is the smallest Click-Stand. It is made from .340″ Easton aluminum tubing and is divided into 6 segments. It folds to approximately 7 1/2″ and is small enough to fit into a coat pocket or small to medium-sized seat or handlebar bag. (This is the one my brother has; in fact, he shot this picture of his.)
Click-Stand Max – The Click-Stand Max is made from .433″ Easton aluminum tubing and can be ordered with either 4 or 5 segments. The Max is intended for tandems, cargo haulers, and loaded touring bikes. (This is the one I have.)
Each Click-Stand is a custom product
Before you can order your Click-Stand, you have to provide the company with two measurements:
With the bike stranding upright, measure from the “contact point” where the Click-Stand will support the bike, straight down to the ground.
Measure the diameter of the top tube.
My 52CM Surl LHT measured 29″ from ground to contact point and the top tube was 1-1/4″.
I liked the demo unit Tom sent me well enough to order my brother, Mark, a world-renowned weight wienie, one for his Trek Madone. His bike was the same 29 inches as mine, but his top tube was some kind of funky triangular shape. Tom guessed correctly that the 1-3/4″ cradle would be perfect.
If your bike has bar-end shifters or for any other reason you can’t slip a pair of brake-bands up to the brake levers, you have to order them unassembled. Putting them together is no big deal, but a pair of pliers to do the crimping helps. As it turned out, I re-routed my bar-end cables, so I could have gone with the pre-built ones.
In addition, you have to tell Tom how many segments you want. More segments equals shorter length, but bigger bundle.
Bro Mark’s first impressions
Here is what I can say about the product –
Fast turn around in the customized order. It is light. It is small. It is easy to use. It is everything it said it would be.It holds the bike very easily, as in it holds it firmly and the execution of using it couldn’t be any easier.I will most likely start out carrying it in my jersey pocket (so that it is easier to get to).
Thanks for the early birthday gift, this is really quite neat. It will be a while before I can get out and use it, but I suspect that at least one person I know will want it.
Here’s an application Tom doesn’t advertise
I was showing the Click-Stand to a guy who carries a car antenna as a self-defense weapon since he regularly commutes through some sketchy neighborhoods where he attracts some unwelcome attention. He liked the idea of the light-weight stand as a substitute.
“I guarantee none of those guys have seen anything like this. When I pull it out and it click-click-clicks into some kind of long, pointy thing, I think it will be a great persuader,” he said.
I could see where it might be useful against an aggressive four-legged animal. Or might be used as an impromptu camera stand for low-level, slow shutter speed shooting.
With only about 42 miles on my new Surly Long Haul Trucker, I looked down and saw that the Cateye Strada computer was showing 0 (that’s zero, nada, zilch) for cadence. That was odd, because it seemed like I was cranking about 80 or 90 RPM.
I pulled over and noticed that the magnet in a nifty plastic housing attached to the crank arm with a Nylon zip tie had slipped down and wasn’t positioned correctly for the sensor to read it. I slid it down about half an inch to where it would register again.
Then it happened again
About a mile up the road, I saw the computer was reading 0 (that’s zero, nada, zilch) again.
At the first opportunity to pull over, I stopped and discovered the reason: the bleeping magnet and its nifty plastic housing had gone MIA (Missing in Action).
I decided that it wasn’t worth looking for it. I searched my tool bag for some Rare Earth Magnets I thought lived there, but discovered that I had taken them out at some point. Rather than muck around, I jumped back on the bike and headed north to Jupiter Island.
I had really wanted to see my cadence, because I’m still learning which gear ratios do what on the new bike.
I rooted around in the official Biking Stuff Junk Drawer until I came upon two sets of two Rare Earth magnets from Radio Shack. (My brother has pointed out that I can buy them a lot cheaper through Amazon. Working on the theory that even a blind hog can find a acorn from time to time, I’ll concede that point to him.)
I had just bought a new tube of Marine Goop from George’s Hardware up the street, so I grabbed it on the way out the door, along with a small piece of double-edged foam tape to hold the magnets in place while I determined their best placement.
Those magnets are really strong
The first thing that happened was that the magnets jumped out of my fingers and latched onto my pedal. After digging them out, which was no easy task, I stuck them on the foam tape and tried for the best position. I couldn’t get a reading.
That’s when I noticed that the sensor “sweet spot” was right over the hole where the pedal screwed in. I stacked the four magnets on top of each other and gave the cranks a spin.
Eureka! It worked.
Obviously, I couldn’t apply Goop here or I’d never be able to get the pedal off again, so I’m going to see how they work being held together by pure magnetic attraction. [Speaking of magnetic attraction, I met my wife in February about 43 years ago, so there must be something in those natural forces that hold things together.]
To be on the safe side
I’m going to take my brother’s advice and order some spares to keep in the tool bag.


 Dad owned a construction company that built roads and bridges, so my earliest memories are being perched next to him on a bulldozer, motor grader or dragline moving dirt around. Diesel fumes and freshly-turned dirt will instantly transport me back to those days.