Year in Review: Kick Stands and Click-Stands

Part of a continuing series on looking back at product reviews I’ve done during 2009

It’s amazing how almost every topic inspires passionate debate among cyclists. Kickstands are one of those Holy War topics with some arguing that they aren’t needed and others – like me – saying they don’t know how you can get along without them.

Here’s a look at two solutions for giving your bike a leg to stand on. (In the case of the ESGE/Pletscher Double-legged kickstand, it gives it two legs to stand on.)

ESGE/Pletscher Double-legged kickstand
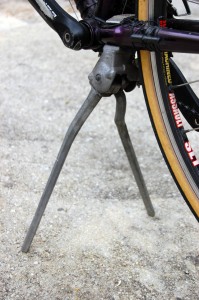
ESGE/Pletscher Double-legged kickstandThis is what it looked like on my Trek 1220. I moved it over to my Surly Long Haul trucker when I bought it at the first of the year.

You can read the full review here.

The nice thing about this kickstand is that it will raise either the front or rear wheel off the ground, which means it can act as a portable work stand. Taking a wheel off to fix a flat or making brake or shifting adjustment is a piece of cake.

Some folks have had problems with this style kickstand either crushing the chain stays or working loose. I haven’t had that happen on either of my bikes. Maybe that just says that I’m weaker than some cyclists and stronger than others.

The long legs WILL dig into soft blacktop or soil and cause the bike to spill over. A strong wind will also dump it.

In fairness, I can’t think of any time when my bike has fallen over when it wouldn’t have fallen over easier and earlier with a conventional kickstand.

The Click-Stand

Most kickstands attach to the bicycle. The Click-Stand takes a completely different approach.

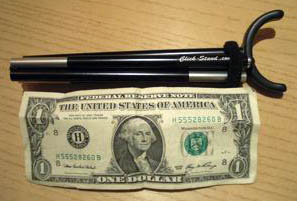
Click-Stand Mini-6

You can read the full review here.

Think of a folding tent pole that deploys with the flick of your wrist and supports the bike from the top tube.

It probably weighs about as much or less than a regular kickstand. Even my weight wienie brother Mark was willing to try one.

Watch this demo that my four-year-old grandson did minutes after I handed it to him.

Wow! captures the idea.

How does it work?

You slip included brake-bands over the brake levers to keep the bike from rolling. (I used Velcro straps to do the job on my bike.)

You flick out the Click-Stand (WOW!), place the rubberized cradle under the top tube just in front of the seat tube, lean your bike over slightly and place the rubberized bottom end about 10 inches off the centerline of the bike.

Your two wheels and the Click-Stand have become a tripod.

DOES it work?

I was impressed. It doesn’t deploy as quickly as my double-legged kickstand, but it’s much more stable. My bike hasn’t taken a spill since I started using it.

Other info about the Click-Stand

Shortly after I got mine, the inventor came up with some nifty ways to mount it on your bike. If you go to my link above, you can see how I carry it on my LHT. Bro Mark just stuffs his in his jersey pocket.

If you’re a Freakbiker riding a tall bike, you make your own manly variation of a Click-Stand out of an old IV stand.

Year in Review: Bicycle Pumps

It’s getting to the time of year when folks are looking for gifts for themselves, their friends or their bikes. Here are some links to some pump reviews I’ve done in 2009.  This is the first of a series of review reviews.

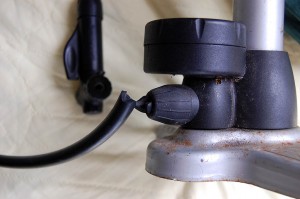
Blackburn floor pump goes BANG!!!

Blown hoseI pulled my car off to the side of the road to help a rider who had flatted on a charity ride. He got his tire pumped up to 119 psi, but when he tried for 120 psi, there was a loud BANG!!!

It wasn’t the tube. It was the hose that had blown near the base of the pump.

Blackburn has a lifetime warranty on their pumps, so I wasn’t worried. Their customer service is a little disappointing, though. After several emails, two calls and 13 minutes on hold being told that my call was very important, Customer Service Courtney said that they were behind in reading their email, that my pump had been discontinued and that they would send me a new Air Tower 2 to replace it.

Blackburn Air Tower 2 has some nice features

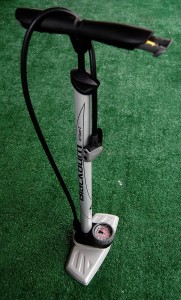
Blackburn Air Tower 2Four days after finally being able to contact Blackburn, a brand-new Blackburn Air Tower 2 arrived on my doorstep.

Here’s the full review of the pump.

Bottom line: it works like a floor pump should. The head has been redesigned. Instead of the T-shaped top on my old pump, this one has a single head with two holes. One is for Schrader valves; the smaller is for Presta.

Some readers have complained that their pumps haven’t worked right with Presta valves, but I haven’t had that experience.

The pump has a nifty storage area in the handle that holds inflators for balls, rafts, pool toys, etc. It’s not a reason to buy the pump, but it’s a nice extra.

Topeak Road Morph Pump with Gauge

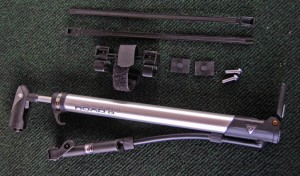
Topeak Road Morph Tire PumpI decided my new Surly Long Haul Trucker deserved a new pump. After doing some research, I ended up with the Topeak Road Morph G Bike Pump with Gauge.

It’s a great pump, but the documentation leaves a lot to be desired.  To save you from going through the (embarrassing) gyrations I went through, I created the Topeak Road Morph Pump with Gauge Guide for Dummies.

The review also covers how I mount the pump on my LHT and what tire tools I carry.

Freakbike Sports 480 LEDs for Halloween

Reader Michael Getzie commented, “I really enjoy your site, just wanted to say thanks for all of the great info you provide. check out my ride on youtube, search for; frozenpeasandcorn, hope you like.”

The YouTube description says, “Covered my bicycle with 480 LED Halloween lights, Powered by 3 Sealed Lead Acid 8.5AH batteries and a 175 watt inverter.”

That’s a lot of juice. About one notch below an Iranian nuclear reactor.

I am humbled

I thought I was the brightest manmade object on the globe (we’re talking lights, not IQ).

I bow before the master.

Thanks for the link, Michael.

GABS Saddle: Crazy or Best Bike Saddle You’ve Seen?

My virtual buddy over at Screaming Bike Monkey posted a picture of this saddle with the comment, “No words can adequately express my feelings at this time…”

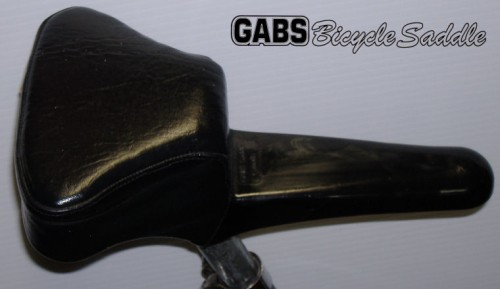
Gabs Bicycle SaddleI wasn’t sure if that meant that he was so in awe of the concept that he was speechless; whether he hated it so much the “If You Can’t Say Something Good, Then Don’t Say Anything Rule was in effect or if he was, like me, looking for quick content for his blog. [Wife Lila said that I shouldn’t have put that last reason in. I overruled her. Some days you go for the easy and you should just fess up and admit it.]

The inventor has ridden more miles than I have

Part of the history of the saddle says,

George Andrews, inventor of the GABS bicycle saddle“GABS Saddle was designed by George Andrews, Courtenay, British Columbia, Canada, as a result of Thousands of cycled kilometers.
George cycles almost every day and has done so since he decided in May 1994, at the age of 65 to cycle across Canada.  He completed the ‘cross-country’ journey in 1995 when he cycled from Tofino, BC to Cape Spear, Newfoundland.  In June of 1996 he cycled to Salt Lake City, USA.

Of course, I always switch to metric distances when I want to impress people too. As in, “I rode a (metric (said in a lower volume)) Century this weekend. Actually, if you didn’t drop your voice when you said “metric,” most non-bikers would think metric meant “metered” or something that sounds even more impressive.

A tip of my helmet to him

I give George applause for coming up with an idea and seeing it through to distribution.

It’s not the craziest design. I’ve seen the ones that have two separately adjustable butt cheeks holders without a nose. It might be OK for casual riders, but a nose is important for controlling the bike, particularly when standing up on the pedals.

In some respects, it resembles an extreme version of the cutout saddles that are supposed to relieve pressure.

What happens when you’re “on the rivet?”

I wonder, though, what happens when you’re “on the rivet,” as cycling commentator Phil Liggett likes to say. That’s where you find yourself sliding forward on the saddle when you’re tired or to put maximum pressure on the pedals. You would find yourself suddenly dropping down what appears to be a couple of inches.

Scream Monkey has a point about the GABS Saddle

I’m not sure I can improve on his comment, “No words can adequately express my feelings at this time…”

I just took a whole bunch more words to come to that conclusion.

Go see George for the whole story of the GABS Saddle

Camera Mount Out of a Soft Drink Bottle

I’ve tried several different ways of mounting my camera to my handlebars depending on what camera I was using and what materials were at hand. I finally settled on a RAM mount for my cameras.

Bro Mark, who is a weight wienie, usually carries a tiny camera (now probably replaced by his trendy iPhone).

Recycle a soda bottle

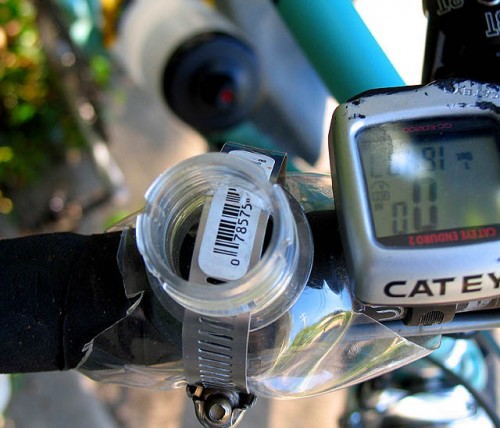
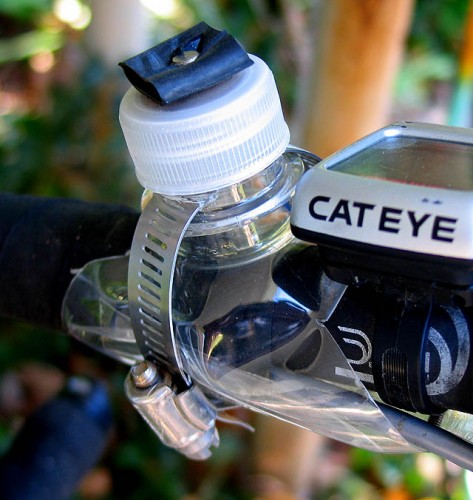
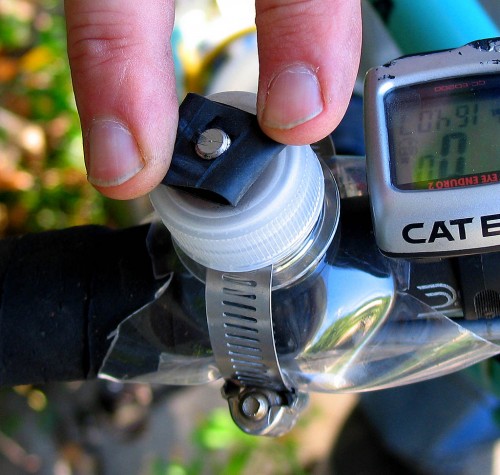
He created a camera mount out of the top of a plastic soda bottle using the bottle and cap, a stainless steel hose clamp similar to this (size will depend on your handlebar), a piece of inner tube and a 1/4 x 20 bolt. You can find all of it at your local hardware store or in the bowels of your junk drawer.

Base of homemade camera mount constructed from plastic soda bottle

Trim to bottle to size

Step One is to trim the top off the bottle. You can do this with a knife or a pair of scissors. With a little pruning, you can leave enough of the bottle to protect your bars. (He said he left strips about three inches long for the wrap-around)

Cut slots for the hose clamp

Step Two is to cut slots into the bottom of the bottle top to hold the hose clamp. I was going to ask Bro Mark how he did it, but he’s tied up on an advertising shoot in Memphis. That means I’m going to wing it and let him make any corrections in the comments section.

Side

I’m going to guess that the easiest way to do it would be with a Dremel Tool if you have one. Since I don’t, I’d be inclined to tackle it with a hacksaw. It’s not rocket science, so anything that will cut two slots and leave you with most of your fingers will work.

[Bro Mark surfaced long enough to say that he thinks he cut the slots with an exacto knife. That might explain what looks to be a scar on the finger on the left.]

Drill a hole in the bottle cap for a 1/4″ x 20 bolt

Top of camera mount made from plastic soda bottleStep Three is to install the bolt to hold the camera.

Camera tripod screws are a standard 1.4″ x 20 thread available at any hardware store.

This is a case where bigger ISN’T better. Get a bolt that’s just long enough to go through the bottle cap and any cushioning material (washer, inner tube) and just far enough into the camera tripod socket to be secure. Mark said he added a lock washer on the bottom and top of the bottle cap (below the inner tube).

Safety warnings

  • DO NOT, DO NOT get one that is one screw turn longer than necessary or you’ll punch through the bottom of your camera. That is a very Bad Thing.
  • I always use a lanyard with any device I attach to my handlebars: GPS, still camera or video camera. That’s to keep from hearing the sickening thud when the expensive device hits the ground, followed by the skittering and disintegrating noises as it disassembles itself.

Use it as a camera mount OFF the bike, too

Make up a second bottle top for use off the bike. When you want to stabilize your camera, fill a soda bottle with water, sand or something heavy, put on the top with the tripod screw and you have a ready-to-use camera support.